|
Final Cut Pro X: Keyboard shortcuts-คีย์ลัด |
 |
|
เขียนโดย Administrator
|
|
วันจันทร์ที่ 29 ธันวาคม 2014 เวลา 10:58 น. |
Final Cut Pro X: Keyboard shortcuts - คีย์ลัด
Final Cut Pro X: Keyboard shortcutsคลิ๊กที่นี่เพื่อ -donwload PDF ไฟล์
Application
|
Command
|
Shortcut
|
Action
|
|
ซ่อน Application
|
Command-H
|
Hide Final Cut Pro
|
|
ซ่อน Applications อื่นๆ
|
Option-Command-H
|
ซ่อน all applications ยกเว้น
Final Cut Pro
|
|
แก้ไขปุ่มต่างๆ
ได้ตามต้องการ
|
Option-Command-K
|
Open the Command Editor
|
|
ย่อส่วน
|
Command-M
|
Minimize Final Cut Pro
|
|
เปิด Library
|
Command-O
|
Open an existing library or a new library
|
|
เปิด Preferences
|
Command-Comma (,)
|
Open the Final Cut ro Preferences window
|
|
ออกจากโปรแกรม
Quit
|
Command-Q
|
Quit Final Cut Pro
|
|
Redo Change
|
Shift-Command-Z
|
Redo the last command
|
|
Undo Change
|
Command-Z
|
Undo the last command
|
ส่วนที่ 2 คีย์ในการตัดต่อ short cut
| | การทำงาน
|
|
|
| | E |
|
-วางภาพในไทม์ไลน์ ใส่ภาพลงไปในไทม์ไลน์
ภาพต่อท้ายคลิปสุดท้ายเสมอ
Add the selection to the end of the
storyline
| W
|
| - Insert-แทรกภาพตรงตำแหน่ง
playhead
Insert the selection at the skimmer
or playhead position
| | Q |
|
วางภาพซ้อนบนช่องวิดีโอ
| |
Shift-Q
| |
วางภาพซ้อนบนช่องวิดีโอแถบล่างสุดเสมอความยาวเท่า
playhead (ถ้าเอาไว้ด้านหลัง)
| |
Command-X
|
| Cut ตัด
Cut ส่วนที่เลือก
| |
Command-C- Copy the selection กอปปี้ส่วนที่เลือก
|
Paste Effects
|
Option-Command-V
|
|
|
|
Paste Attributes
|
Shift-Command-V
|
|
Copy Effects
|
Option-Command-C
|
|
|
Copy Keyframes
|
Option-Shift-C
|
Delete
Shift-Delete
|
|
|
Paste Keyframes
|
Option-Shift-V
|
ลบ Delete the Timeline
selection, reject the Browser
selection, or remove a through edit
ลบคลิปออกแต่เหลือช่องว่างไว้
| |
Option-F | | จับภาพนิ่งพร้อมแทรกตรงนั้นเลย
Insert/Connect Freeze Frame --
จับภาพนิ่งพร้อมในตำแหน่งที่
playhead วางอยู่
| |
Option-W
|
|
Insert Gap -แทรกช่องว่างในไทม์ไลน์
Insert a gap
clip at the skimmer or playhead position
| B
|
| มีดโกนตัดภาพ | |
Command-B
| | ตัดเฉพาะแถบV-อันล่างสุด ตัดภาพตรงช่อง playhead วางอยู่ ในstory line ลาสงสุด
| |
Shift-Command-B
| |
ตัดภาพตรงที่หัวเล่นวางอยู่ทุกแถบใน story line
| | A | | กลับสู่โหมดปกติ | |
Command-A
| |
Select all clips
| | Shift-Q | | วางภาพซ้อนบนช่องวิดีโอแถบล่างสุดเสมอความยาวเท่า
playhead (ถ้าเอาไว้ด้านหลัง) | |
V ยกเลิกกด
V อีกครั้ง
| |
ซ่อนคลิป
Clip ตอนเปิดดู
|
|
|
| |
Option–Command–Up Arrow
| | ยกคลิปนั้นขึ้นบนv1-storyLine |
เสียง
|
Shift-Command-G
|
|
แตกไฟล์ภาพและเสียงลงในไทม์ไลน์
|
|
ปรับปุ่มเสียง
Volume Absolute
|
Control-Option-L
|
Adjust the audio volume across all selected clips to a specific
dB value
|
|
ปรับปุ่มเสียงกลับค่าเดิม
|
Control-L
|
Adjust the audio volume across all selected clips by the same
dB value
|
| |
|
แยกโชว์ช่องเสียง
Audio/Video
|
Control-S
|
| |
|
Control-Option-S
|
แตกซิงค์ภาพและเสียง
|
| | |
Control-Hyphen (-) ลดความดังเสียงลง 1db
| | Control-shift-S - แตกซิงค์ภาพและเสียง โดยขึ้นแถบอยกออกมาจากวีดีโอ Detach Audio
| | | | | | | | คีย์ในการ ตัดแบบ Multi Cam
| |
|
Cut and Switch to Viewer Angle 1
|
กดปุ่มเลข 1
|
Cut and switch the multicam clip to angle 1 of the current bank
|
|
Cut and Switch to Viewer Angle 2
|
กดปุ่มเลข 2
|
Cut and switch the multicam clip to angle 2 of the current bank
|
|
Cut and Switch to Viewer Angle 3
|
กดปุ่มเลข 3
|
Cut and switch the multicam clip to angle 3 of the current bank
|
|
Cut and Switch to Viewer Angle 4
|
กดปุ่มเลข 4
|
Cut and switch the multicam clip to angle 4 of the current bank
|
|
Cut and Switch to Viewer Angle 5
|
กดปุ่มเลข 5
|
Cut and switch the multicam clip to angle 5 of the current bank
|
| |
|
|
|
|
|
|
|
|
|
|
|
|
|
|
|
|
|
|
|
|
|
|
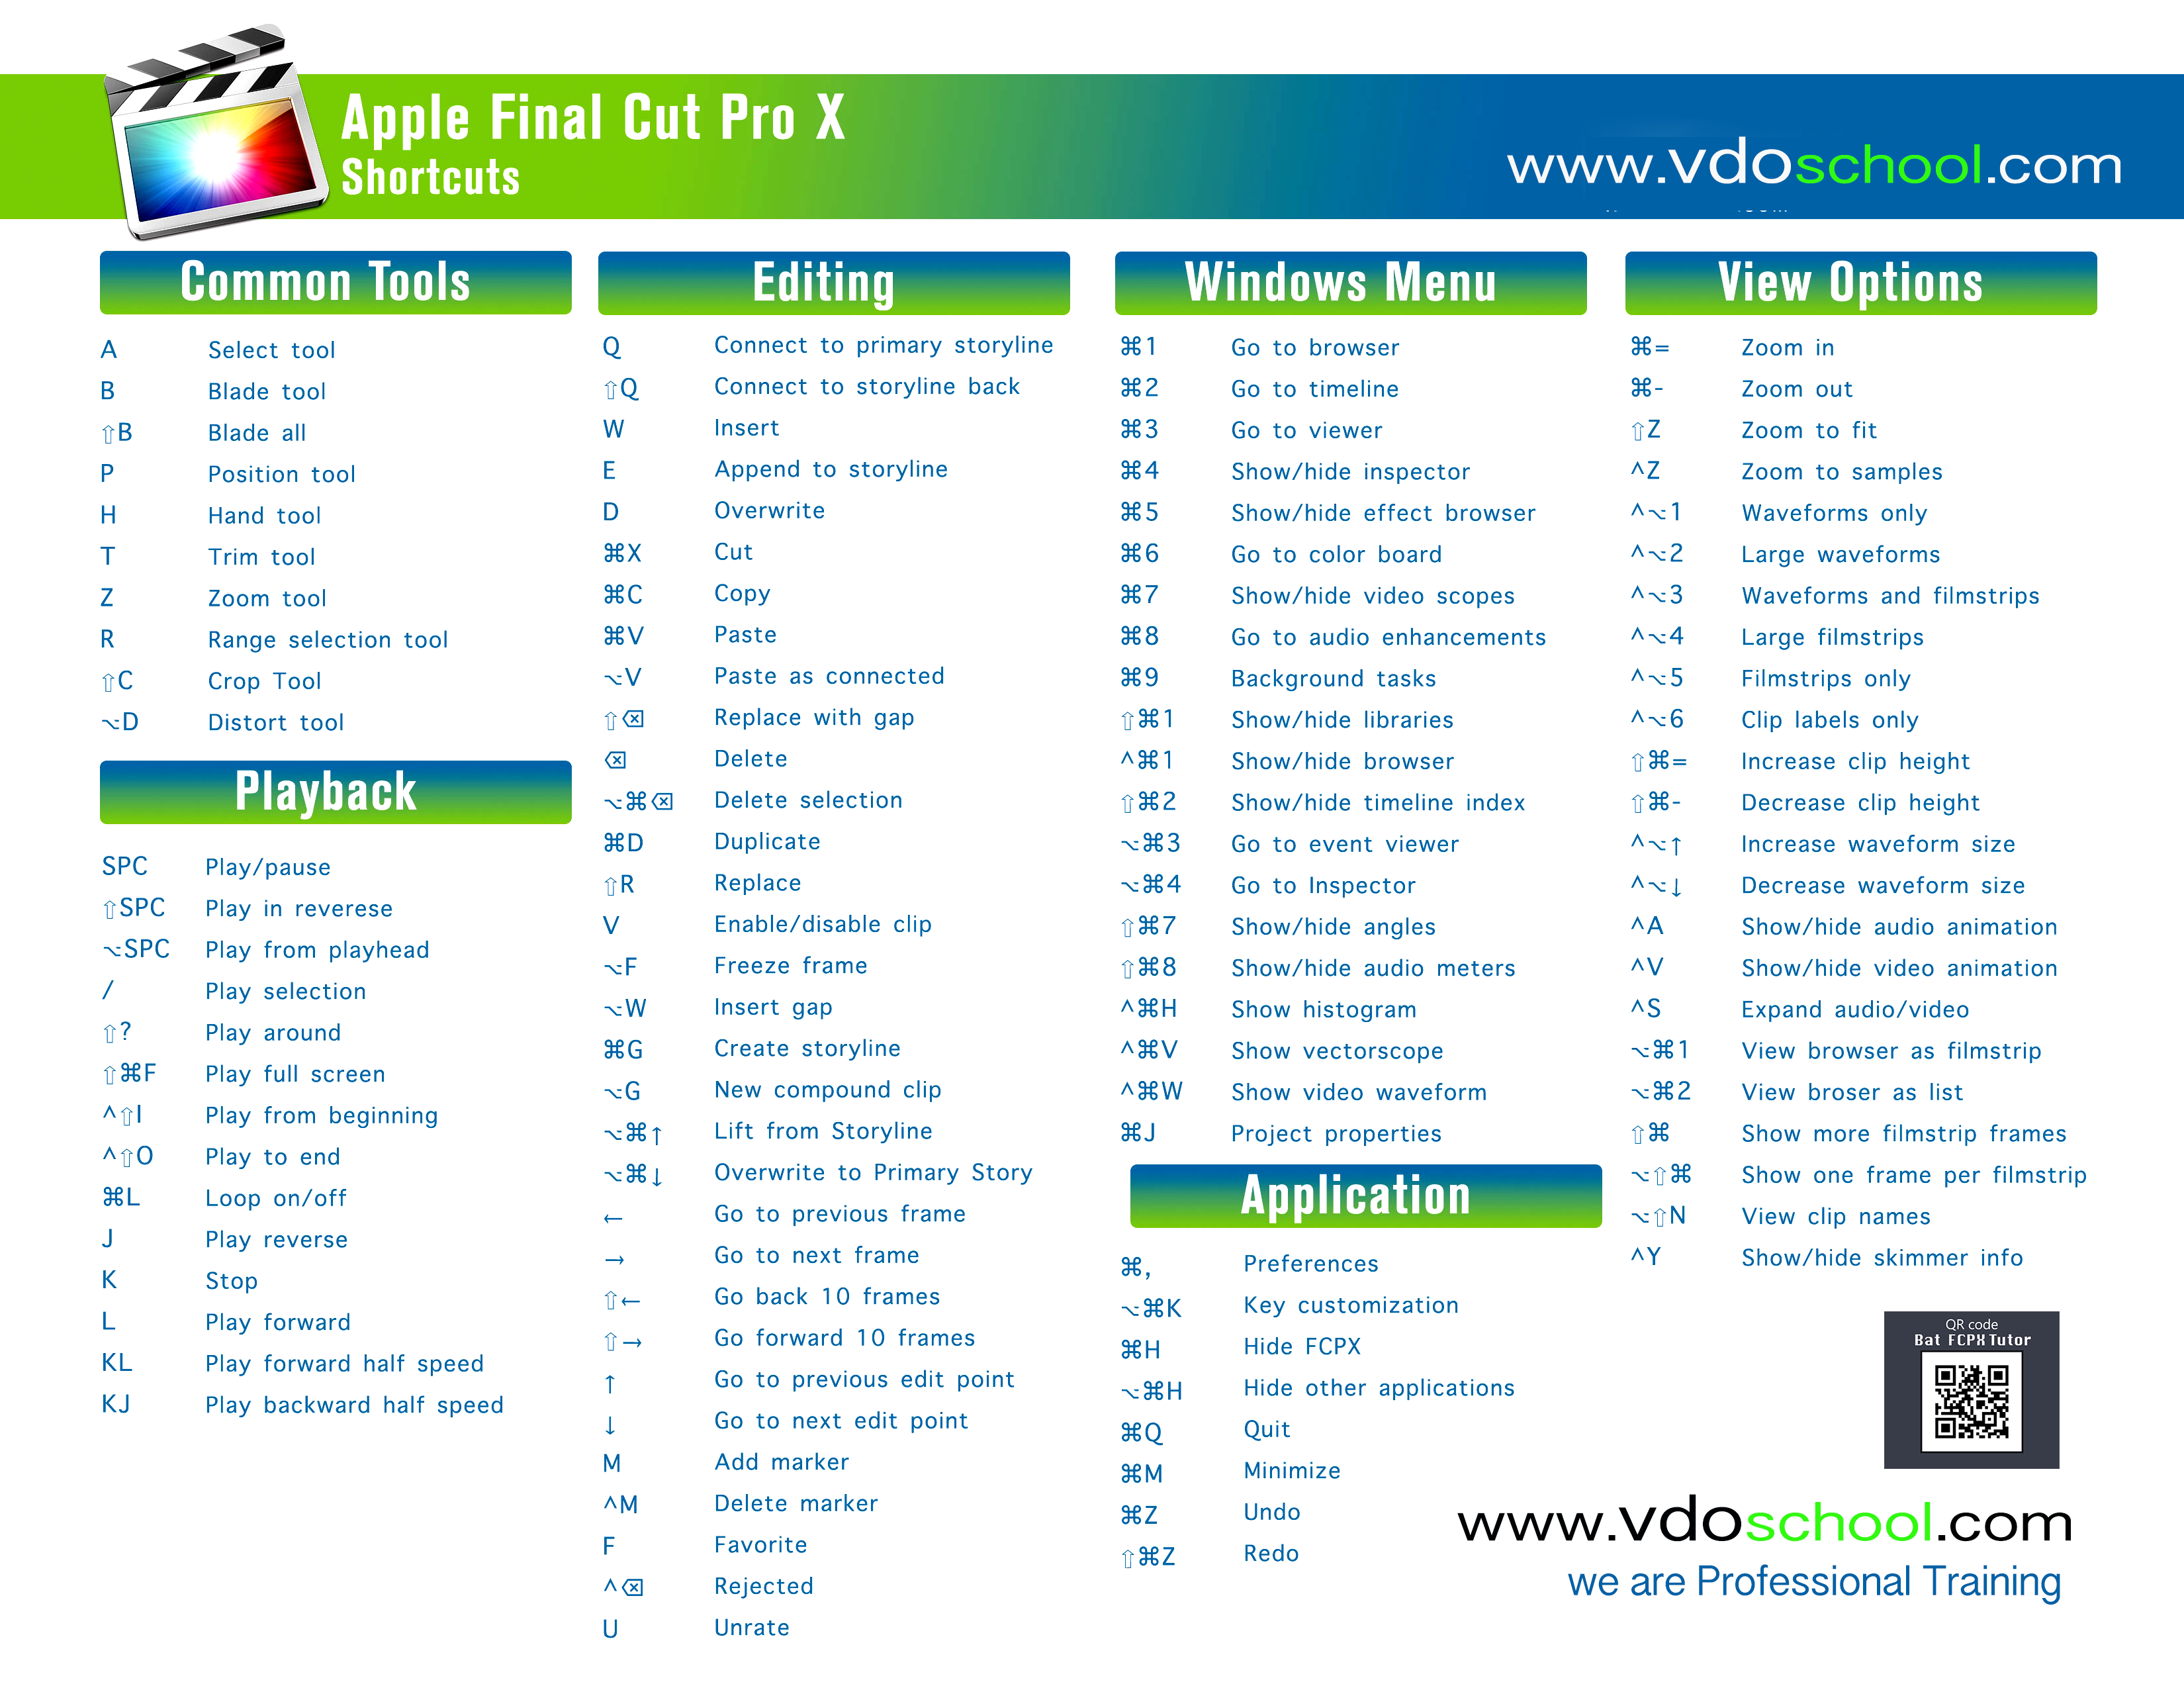
คลิ๊กเซฟภาพไปปริ้นได้เลยครับ ขนาดเท่า A4
|
|
แก้ไขล่าสุด ใน วันศุกร์ที่ 22 เมษายน 2016 เวลา 15:34 น. |